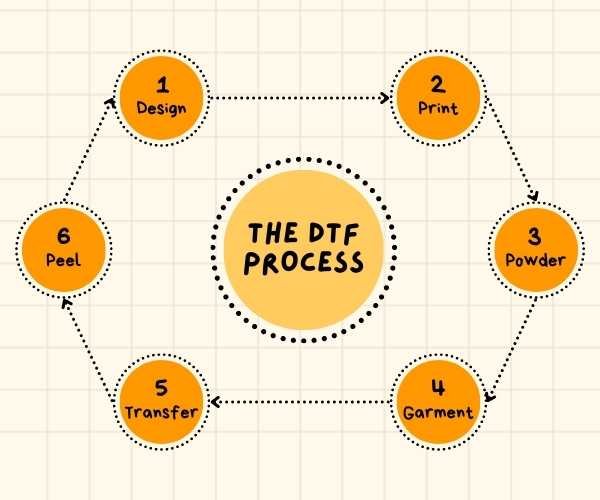
DTF printing has gained popularity in recent years as a cost-effective and efficient method for printing designs onto garments. This process involves printing the design onto a film, which is then transferred to the garment using a heat press. In this guide, we will walk you through the DTF printing process step-by-step, including the equipment and consumables needed, preparing the design for printing, applying adhesive powder, heat pressing the design onto the garment, and quality control.
Whether you are a seasoned printer or a beginner, this guide will provide you with the necessary information to ensure your DTF printing process is seamless and produces high-quality prints.
So, let’s dive in!
Equipments And Consumables Needed for DTF Printing
Before we get into the process of DTF Printing, let’s take a look at the equipment and consumables needed to get started.
Direct to Film Printer
The first piece of equipment you will need for DTF Printing is a Direct to Film Printer. This printer is specially designed to print high-quality designs onto the film. It uses a specialized ink that is durable and long-lasting, ensuring that the designs look great even after multiple washes.
Automatic Powder Shaker
An Automatic Powder Shaker is an essential tool for DTF Printing. It is used to apply the powder to the film after the design has been printed. The powder helps to bond the ink to the garment during the heat transfer process. The Automatic Powder Shaker ensures that the powder is applied evenly, resulting in a high-quality print.
Air Filter
An Air Filter is used to filter out any dust or debris that may be present in the printing area. It ensures that the film and garments remain clean, resulting in a high-quality print.
Heat Press Machine
A Heat Press Machine is used to transfer the design from the film to the garment. It uses heat and pressure to bond the ink to the garment, resulting in a high-quality print. A good heat press machine is essential for DTF Printing as it ensures that the design is transferred evenly and accurately.
DTF Inks
DTF Inks are specially formulated inks that are designed to work with DTF Printers. They are durable and long-lasting, ensuring that the designs look great even after multiple washes. These inks are available in a variety of colors, making it easy to create vibrant and eye-catching designs.
DTF Films
DTF Films are specially designed films that are used to transfer the design from the printer to the garment. They are made from high-quality materials that ensure that the design is transferred accurately and evenly. These films are available in a variety of sizes, making it easy to choose the right size for your design.
DTF Powder
DTF Powder is used to bond the ink to the garment during the heat transfer process. It is an essential part of the DTF Printing process as it ensures that the design is transferred accurately and evenly. The powder is available in different grades, allowing you to choose the right powder for your specific needs.
RIP Software
RIP software is used to convert the design into a format that can be printed onto the DTF film. This software ensures that the print quality is optimized and that the colors are accurate.
Preparing the Design for Printing
Once you have all the necessary equipment and consumables, it’s time to prepare the design for printing. The first step is to create or select the design you want to print.
The design should be in a high-resolution format, preferably 300 dpi or higher, to ensure that the print quality is excellent. It’s also essential to ensure that the design is suitable for DTF printing. Designs with small details or intricate patterns may not transfer well onto the garment using this process.
Once you have the design, you need to prepare it for printing. This involves mirroring the image, which means flipping it horizontally. This step is essential because the design will be printed onto the film in reverse, and mirroring it ensures that the final print is in the correct orientation.
After mirroring the image, you need to print it onto the DTF film. It’s crucial to adjust the printer settings to ensure that the ink adheres correctly to the film. Once the design is printed onto the film, allow it to dry for a few minutes before proceeding to the next step.
Printing the Design onto the Film
Printing the design onto the film is a crucial step in the DTF printing process. It’s essential to ensure that the ink adheres correctly to the film to produce high-quality prints. Here’s how to print the design onto the film:
Place the DTF film onto the printer tray, ensuring that the coated side is facing up. Adjust the printer settings to ensure that the ink adheres correctly to the film. Once the printer is ready, print the design onto the film. After printing, allow the film to dry for a few minutes before proceeding to the next step.
Powdering and Shaking by Powder Shaker
The DTF Powder shaker is a device that helps to evenly distribute the DTF (Direct-to-Film) powder onto the transfer film for printing. It works by placing the transfer film and the printed design on top of the shaker, then shaking the device to distribute the powder evenly onto the film. The excess powder is then removed using a vacuum or brush, leaving a clean and precise design on the film.
The Powder shaker is a simple and effective tool that makes the powdering and shaking process quicker and easier than manually shaking powder, ensuring a high-quality print output.
Preparing the Garment for Printing
Now that the design is printed onto the DTF film, it’s time to prepare the garment for printing. The first step is to select the garment you want to print on. It’s crucial to select the right garment for the design and ensure that it’s clean and free from any wrinkles or folds.
Next, preheat the garment using the heat press machine. This step is essential because it helps to remove any moisture or wrinkles from the garment, ensuring that the design adheres correctly to it. Preheat the garment for a few seconds at the recommended temperature before proceeding to the next step.
After preheating, place the garment onto the heat press machine, ensuring that it’s flat and free from any wrinkles or folds. It’s essential to position the garment correctly to ensure that the design is in the desired location.
Heat Pressing the Design onto the Garment
After applying the adhesive powder, it is time to heat press the design onto the garment. To do this, place the garment onto the heat press machine and ensure that it is placed correctly. Next, place the DTF film with the design facing down onto the garment.
Ensure that the heat press machine is set to the correct temperature, pressure, and time. This will ensure that the design transfers onto the garment correctly. After the design has been heat pressed onto the garment, it is time to remove the film and adhesive residue.
Removing the Film and Adhesive Residue
Removing the film and adhesive residue is the final step in the DTF printing process. To do this, carefully remove the film from the garment. Ensure that the film is removed slowly and carefully to avoid damaging the design.
After removing the film, use a brush to remove any adhesive residue that may be left on the garment. Ensure that all the adhesive residue is removed, as this can affect the quality of the print.
Final Touches and Quality Control
After removing the film and adhesive residue, it is time to do a final quality check. Ensure that the design has transferred onto the garment correctly and that there are no defects or errors. If there are any defects or errors, you may need to repeat the DTF printing process.
After completing the quality check, your DTF print is ready! Ensure that the garment is cared for correctly to ensure that the print lasts a long time.
Conclusion
DTF printing is an excellent method for printing designs onto garments. By following the outlined steps, you can achieve high-quality prints that are durable and long-lasting. Ensure that you have the necessary equipment and consumables and that you prepare the design and garment correctly before starting the DTF printing process.


